 Skip to content
PC Tech, Windows 11
Ultimate Guide to System Restore Windows 11: Step by Step

Welcome to our comprehensive guide on how to perform a system restore in Windows 11. If you’re experiencing software issues, driver conflicts, or simply want to revert your system to a previous state, system restore can help you safeguard and recover your Windows 11 computer efficiently.
In this guide, we’ll walk you through the step-by-step process of system restore, including how to access the feature, create system restore points, restore your computer to a previous state, troubleshoot with system restore, and best practices for using this powerful feature.
With our detailed instructions and expert tips, you’ll be equipped with the knowledge and skills to effectively use system restore and protect your Windows 11 computer.
Key Takeaways
- System restore is a powerful feature that can help you safeguard and recover your Windows 11 computer.
- By following our step-by-step guide, you’ll be equipped with the knowledge and skills to effectively use system restore in Windows 11.
- Creating system restore points can provide you with a safety net before making any major changes to your computer.
- System restore can be an effective troubleshooting tool when dealing with system-related issues.
- Regularly creating restore points and managing disk space are important best practices to maximize the benefits of system restore in Windows 11.
Understanding System Restore
Before delving into the intricacies of system restore on Windows 11, it is essential to grasp the concept and purpose of the system restore utility in Windows 11.
The system restore utility is an inbuilt feature in Windows 11 that allows users to revert their system to a previously saved restore point. This point contains all system configurations, settings, and data from a specific date and time. The utility serves as a safeguard for your Windows 11 computer, helping you to recover your system in case of any complications or changes made to your computer that may have led to a reduced system performance or instability.
The system restore utility is easy to use and enables you to restore your computer to a previously functional state when issues arise. With system restore, you can quickly undo any recent changes made to your system. This includes uninstalling an application or driver, updating software, modifying system settings, or applying system-wide changes.
Using System Restore on Windows 11
The process of using system restore on Windows 11 requires creating restore points, which can be done manually or automatically. These restoration points are created periodically or before significant changes are made to your computer’s system.
At times, software issues or driver conflicts may arise even after creating restore points. Such instances necessitate using system restore to recover your system to a previously saved restore point.
To use system restore, you need to access the system restore utility and follow the step-by-step prompts of the system restore wizard. The wizard provides you with different options to choose the desired restore point. After selecting a restore point, the system restore utility verifies the selection and initializes the restoration process.
Pro Tip: Always create restore points before making any significant changes to your computer’s system to avoid losing essential data and configurations.
How to Access System Restore in Windows 11
Performing a system restore in Windows 11 is an effective way to revert your computer to a previous state if you’re experiencing software issues, driver conflicts, or just want to undo any changes. Here are the steps to access and use the system restore feature in Windows 11:
- Click the Start menu and type “system restore” in the search box.
- Click on the “Create a restore point” option that appears in the search results.
- Click on the “System Restore” button located in the “System Properties” window that pops up.
- On the “System Restore” window, select “Next” to proceed.
- Choose the desired restore point from the list of available options. You can also choose to show more restore points by checking the “Show more restore points” box.
- Review your selected restore point and click “Next” to proceed.
- Confirm your selected restore point and click “Finish.” Your computer will start the system restore process.
Alternatively, you can also access system restore from the Control Panel or Command Prompt. Follow these steps:
- Open the Control Panel and click on “System and Security.”
- Select “File History” and then click on “Recovery.”
- Click on “Open System Restore.”
- Follow the same steps as mentioned above.
To use Command Prompt, follow these steps:
- Click the Start menu and type “Command Prompt.”
- Right-click on “Command Prompt” and select “Run as administrator.”
- Type “rstrui.exe” in the Command Prompt window and hit Enter.
- Follow the same steps as mentioned above.
By following these steps, you can easily access and use system restore to troubleshoot and revert changes on your Windows 11 computer.
Creating System Restore Points
One of the best ways to make the most out of the Windows 11 system restore feature is to create restore points regularly. A restore point is essentially a snapshot of your system’s current state. This means that if anything goes wrong, you can quickly and easily restore your computer to a previous state using the restore point.
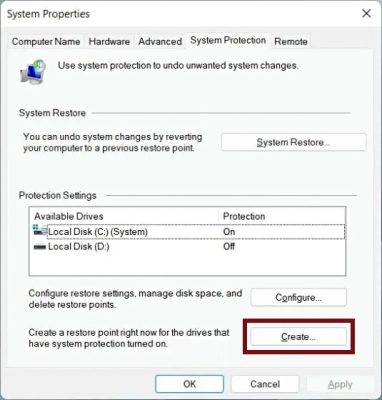
Steps to Create a System Restore Point in Windows 11
- Open the Start menu and type “Create a Restore Point” in the search bar, then click on the top result.
- Click on the “Create” button in the System Protection tab.
- Enter a description for the restore point (for example, “Before installing new software”) and click “Create” again.
- Windows 11 will create the restore point and notify you when it’s done.
It’s important to note that system restore points don’t take up a significant amount of disk space, so it’s a good idea to create them regularly, especially before making any major changes to your computer, such as upgrading to a new operating system or installing new software.
By creating restore points regularly, you’ll have a safety net that allows you to easily revert back to a previous state if anything goes wrong.
Restoring Your Computer to a Previous State
Restoring your computer to a previous state is a powerful tool that can help you undo recent changes that have caused problems on your Windows 11 computer. Here are the steps to follow:
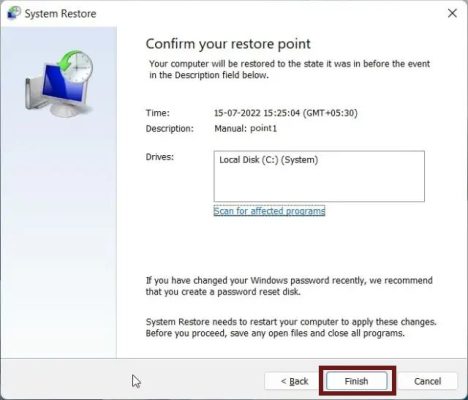
- First, go to the Start menu and type “system restore”. Then, select “Create a restore point” from the search results.
- Next, select “System Restore” from the System Properties window.
- In the System Restore window, select “Next” to proceed.
- Choose a restore point from the list of available restore points. You can check the “Show more restore points” box to see additional restore points.
- Click “Next” and then “Finish” to start the restoration process.
- Your computer will restart during the process, and you should not interrupt it.
- After the restoration process is complete, your computer will return to the selected restore point, and any changes made after that point will be undone.
It’s important to note that system restore will not affect your personal files, such as documents, photos, or emails. However, it will uninstall any software or drivers that were installed after the restore point was created. You may need to reinstall any programs that were uninstalled.
By using the system restore feature in Windows 11, you can undo any unwanted changes and get your system back to a stable state. Make sure to create restore points regularly, so you can always revert to a previous state if needed.
Troubleshooting with System Restore
System restore is not only useful to revert your Windows 11 computer to a previous state but also to troubleshoot various system-related issues. In this section, we’ll explore how to use system restore utility in Windows 11 to troubleshoot problems effectively.
Identifying the Problem
The first step in troubleshooting with system restore is identifying the problem your computer is facing. Once you have identified the issue, determine the date and time when it started occurring.
Creating a Restore Point
If you haven’t already created a restore point, create one before continuing with the troubleshooting process. This will give you a fallback option in case things go wrong while troubleshooting.
Performing System Restore
To perform system restore, follow the steps we highlighted in Section 5. Choose a restore point that was created before the problem occurred, and let the system restore wizard do its work.
Testing Your Computer
After the system restore process completes successfully, test your computer to see if the issue has been resolved. If the issue is still present, you may need to choose an earlier restore point and repeat the process until you find the point that resolved the problem.
Note: System restore may not always be the solution to your problem. If the issue persists even after performing system restore, you may need to consider alternative troubleshooting methods or seek professional assistance.
System Restore Best Practices
System restore is an essential tool for safeguarding your Windows 11 computer and recovering from system-related issues. To help you make the most out of this feature, we’ve compiled a list of best practices for system restore:
Regularly Create Restore Points
Creating regular restore points is crucial to ensuring that you have a safety net before making any significant changes to your computer. It’s recommended to create a restore point before installing any software or making any significant system changes. This way, if anything goes wrong, you can quickly revert your system to a previous state.
Manage Disk Space
If you have limited disk space on your Windows 11 computer, it’s crucial to manage your restore points’ size. By default, Windows 11 allocates a specific amount of space for system restore. However, you can adjust this space allocation to ensure that you have sufficient disk space for other tasks. To do this, go to the system properties and adjust the disk space allocation for system protection.
Use Other Recovery Options When Appropriate
Although system restore is an effective tool, there may be situations where it’s not enough to troubleshoot your system. In these cases, you may need to use other recovery options, such as a system reset or a clean install of Windows 11. Make sure to weigh the pros and cons of each option to ensure that you choose the best approach for your specific needs.
Regularly Update Your System
Keeping your Windows 11 computer up to date with the latest security patches and software updates can help prevent system-related issues that may require system restore. By regularly updating your system, you’ll ensure that your computer is running smoothly and efficiently.
Only Use System Restore When Necessary
System restore should be used as a last resort when dealing with system-related issues. Before reverting your system to a previous state, make sure to troubleshoot the issue and explore other potential solutions. This way, you can avoid potentially losing any data or system configurations.
System Restore Alternatives in Windows 11
While system restore is an excellent tool, Windows 11 also offers alternative methods to revert changes and troubleshoot system issues. Let’s explore some of these options:
Reset this PC
If you want to start fresh with a clean slate, resetting your PC might be the best option. This feature allows you to keep your personal files while removing all installed apps and settings. Resetting your PC is a straightforward process that won’t take much time.
Uninstalling recent updates
Another option is to uninstall any recently installed updates that may have caused the issue you’re experiencing. To do this, navigate to Settings > Update & Security > Windows Update > View update history > Uninstall updates. Here, you can select the update you want to remove and follow the on-screen instructions.
System Image Recovery
System Image Recovery is a powerful tool that allows you to restore your computer to a previous state using a system image. A system image is a backup of your computer’s entire operating system, programs, and files. Creating a system image is similar to creating a system restore point but offers a more comprehensive backup solution.
Keep in mind that System Image Recovery requires you to have previously created a system image. If you haven’t done so, it won’t be an option for you.
By understanding these alternatives to system restore, you’ll have a better idea of how to troubleshoot and revert changes in Windows 11. Choose the best option that suits your specific needs and preferences.
Conclusion
Without a doubt, system restore is a crucial utility for safeguarding your Windows 11 computer. By following this comprehensive guide, you should now be equipped with the knowledge and skills to effectively use system restore to troubleshoot and revert changes on your computer.
Final Thoughts
We hope this guide has provided you with valuable insights into the world of system restore on Windows 11. It’s always wise to keep regular backups of your most important files and folders, as well as creating restore points before making any major changes to your system.
Stay Up to Date
With the constant evolution of technology, it’s important to stay informed about the latest updates and features. Be sure to check for updates regularly to ensure that your Windows 11 computer is running smoothly and efficiently.
Thank You for Reading
We appreciate you taking the time to read this guide and hope it has been helpful to you. If you have any feedback or additional questions, feel free to reach out to us via our contact page.
FAQ
What is system restore?
System restore is a feature in Windows 11 that allows you to revert your computer’s settings, programs, and system files to a previous state, effectively undoing any recent changes and troubleshooting certain issues.
Why would I need to perform a system restore in Windows 11?
There are several reasons you may need to perform a system restore in Windows 11. It can help you resolve software issues, driver conflicts, and restore your system to a previous stable state after encountering problems or changes that have caused instability.
How do I access system restore in Windows 11?
There are multiple ways to access system restore in Windows 11. You can use the Start menu, Control Panel, or Command Prompt. Each method provides step-by-step instructions to access the system restore feature.
How do I create system restore points in Windows 11?
Creating system restore points in Windows 11 allows you to save specific system configurations. We’ll guide you through the process, ensuring you have a safety net before making any major changes to your Windows 11 computer.
How do I restore my computer to a previous state using system restore?
Restoring your computer to a previous state using system restore is straightforward. We’ll explain how to navigate through the system restore wizard, allowing you to choose and restore your Windows 11 computer to a desired point in time.
Can system restore help with troubleshooting in Windows 11?
Yes, system restore can be an effective troubleshooting tool in Windows 11. We’ll show you how to utilize system restore to troubleshoot problems, such as software conflicts and unstable system behavior, helping you resolve issues more efficiently.
What are some best practices for using system restore in Windows 11?
To maximize the benefits of system restore in Windows 11, we’ll share some best practices. These include regularly creating restore points, managing disk space, and other tips to ensure you get the most out of this powerful feature.
Are there alternatives to system restore in Windows 11?
While system restore is an excellent tool, Windows 11 also offers alternative methods to revert changes and troubleshoot system issues. We’ll explore these alternatives and help you determine which approach is best suited for your specific needs.