 Skip to content
Windows 11
Windows 11 Pro – How to download, install, and activate?
Downloading, installing, and activating Windows 11 Pro requires several steps. Please note that you should have a valid Windows 11 Pro product key to activate your copy of Windows. Here’s a step-by-step guide:
Step 1: Check System Requirements
Before you begin, make sure your computer meets the minimum system requirements for Windows 11 Pro. These requirements may change over time, so it’s important to check Microsoft’s official website for the most up-to-date information.
Step 2: Obtain a Windows 11 Pro Product Key
You’ll need a valid Windows 11 Pro product key to activate your copy of Windows. You can purchase a product key from MyLegitkeys.com, authorized retailers, Link: https://mylegitkeys.com/product/microsoft-windows-11-pro-product-key-activation-license
Step 3: Download Windows 11 Pro
-
Visit the official Microsoft website to download the Windows 11 Pro installation media. Microsoft may provide a tool for creating installation media, or you can download an ISO file.
-
Follow the on-screen instructions to download the installation files or create a bootable USB drive if you’re using an ISO file.
Step 4: Install Windows 11 Pro
-
Insert the bootable USB drive or mount the ISO file on your computer.
-
Start or restart your computer and boot from the USB drive or the mounted ISO file. You may need to access the boot menu or BIOS/UEFI settings to select the boot device. The specific key to access these settings varies by computer manufacturer and can usually be found in the startup splash screen or the computer’s manual.
-
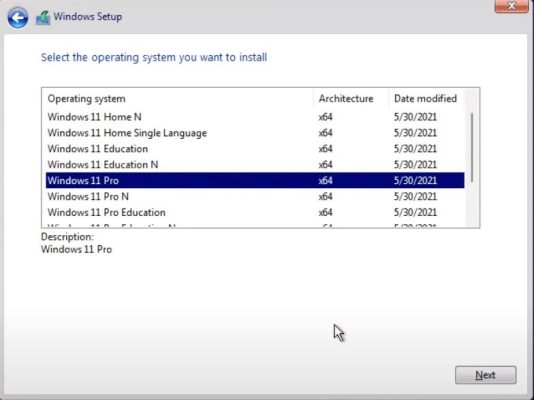
Once the Windows 11 Pro installation process begins, follow these steps:
- Choose your language, time, and keyboard preferences.
- Click “Next,” and then click “Install now.”
- Enter your Windows 11 Pro product key when prompted.
- Accept the license terms and click “Next.”
- Select “Custom: Install Windows only (advanced)” as the installation type.
- Choose the drive or partition where you want to install Windows 11 Pro and click “Next.”
-
Follow the on-screen instructions to complete the installation. Your computer will restart multiple times during this process.
Step 5: Set Up Windows 11 Pro
- After the installation is complete, you’ll be guided through the initial setup. Customize settings, create user accounts, and connect to a network.
Step 6: Activate Windows 11 Pro
-
Once your Windows 11 Pro installation is complete and you’re logged in, you’ll need to activate Windows using your product key:
- Go to Settings: Press Win + I to open the Settings app.
- Click on “Update & Security.”
- Select “Activation” from the left sidebar.
- Click “Change product key” and enter your Windows 11 Pro product key.
- Follow the on-screen instructions to complete the activation process.
Step 7: Updates and Drivers
-
After activation, check for Windows updates to ensure your system is up to date with the latest security and feature updates.
-
Install drivers for your hardware components, such as graphics, sound, and network drivers, to ensure optimal performance.
Following these steps, you should have successfully downloaded, installed, and activated Windows 11 Pro on your computer.